The design of the pull up bar is the most critical element. You must account for structural concerns, usability and optimize for the space you have available. It’d be nice to be able to provide a set of plans that will work for everyone, but unfortunately, that’s not the way it works. We’re building a custom pull up rig after all, it’s going to be unique for nearly every situation based on the needs of the user and constraints of the surrounding structure.
Requirements
When designing your rig, you first need to consider how many people you’d like it to hold and if you have any special needs like adjustable height bars, bars high enough to mount rings for muscle ups, etc. So go ahead, take a break from reading this and put together your personal list of requirements. An example list might include the following:
Pull-up Bar Requirements
- Large enough to accomodate 24 people at once
- Row of adjustable height bars for shorter folks
- Keep as much structure off the floor as possible to maximize usable ground space
Constraints
Now that you’ve got a list of what you want to do, it’s time to survey your space. Where in your space do you have room to build a structure that is large enough to fit the number of people you want (as a general rule of thumb leave 3 feet of bar per person)? Where is there enough height to get the bars as high as you need them to meet your requirements from above? Where are there plenty of places to structurally affix your rig to your building? Take your time and find the optimum space in your building for your rig.
Drawing
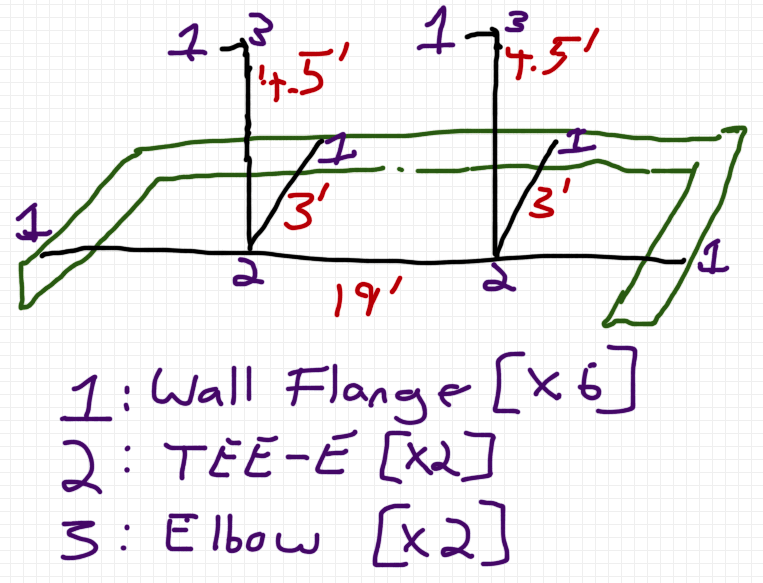
Now things are starting to come together. You probably have a vision in your mind of what you want and where you want it. It’s time to put pen to paper (or mouse to computer) and sketch up your design. This can be as simple as drawing on a napkin or for more complicated systems you may want to use CAD software such as Google’s free drawing tool – Sketchup. Below you’ll see a drawing I did for the CFP structure in Sketchup. This system was large enough that I felt using CAD software was warranted. However, the other two systems I designed were drawn with simple paper sketches.
This Rig Meets the Requirements from Above
Either way, you’re going to need to take measurements of your building in this step. Check the height and width of your walls and the distance of your ceiling joists above the ground. Determine the distance between walls. Measure where structural elements such as studs or rafters fall. The exact method you use to tie into your structure is up to you, but the larger the rig the more tie-ins you’ll need. In the picture above you’ll notice 8 ties into the ground, 7 into the walls and 10 into ceiling joists. For examples of less complicated systems and how they were tied into their surrounding structure, check out the pictures in my overview post.
I will also say that using the materials I’ve outlined, it is advisable not to space your support elements apart greater than 6 feet. If you look at the drawing above you’ll see the supports going into the walls, floor and ceiling rafters… each of these elements is spaced by 6 feet. The final thing to consider as you draw up your system is which runs of pipe will be continuous. For example, in the drawing above, the pipe running from left to right (same direction as the ceiling joists) are solid. The segments that go between these solid pieces (front to back in the picture – heading toward the window) are smaller, 6 foot sections.
Parts List
Your drawing from above will depict all the necessary pieces of pipe, all of the wall / floor mounting flanges, the elbow joints, etc. Every piece of material you need for your structure as well as all of the anchoring supplies can be extracted from your drawing. So get out your Hollaender catalog and make your shopping list for speed rail fittings, pipe, nuts, bolts, washers and anchors.
Wrap Up
Of course, now that you have your list, it’s time to go shopping. I personally purchased my pipe from a local industrial store, got my anchoring supplies from Home Depot and purchased my speed-rail fittings online. Though, you can source nearly everything online if you want, take a look at my speed rail and anchoring pages for online sources of those supplies.

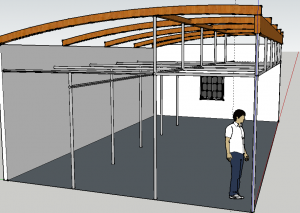
You’re very close to making your design a reality. To get you psyched take a look at the CFP rig drawing and the actual pipes. Get pumped, it’s time to build your pull up bars!
[ois skin=”Garage Gym”]